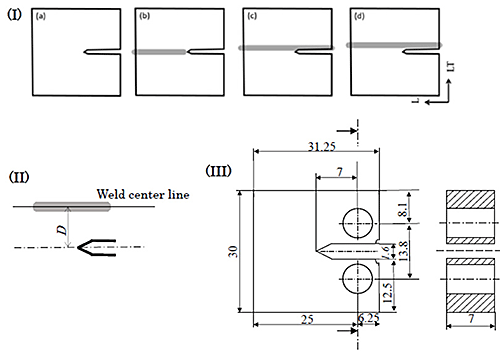
In 5000 series (Al-Mg) alloys, hydrogen embrittlement (HE) becomes a concern when Mg content exceeds 5%. The local Mg content will become higher than 5% due to solidification segregation in the weld joint of 5083 alloy. In this study, as illustrated in Fig. 1, resistance to HE of MIG -welded 5083 aluminum alloy at three areas (weld center, weld corner and HAZ) has been investigated by newly developed humid gas stress corrosion cracking (HG-SCC) test. Slow strain rate tensile (SSRT) test on base metal and welded joint has been also conducted for comparison.
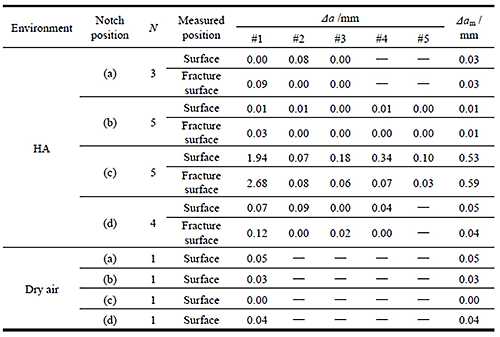
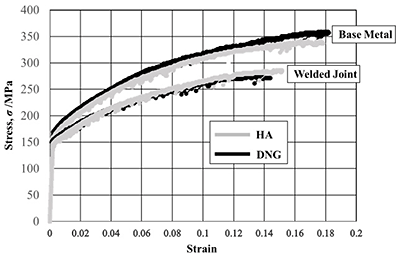
The HG-SCC test results are summarized in Table 1. It has been newly revealed that HG-SCC crack extends only in the sample of weld corner, confirming HE in this area. For the other areas, HG-SCC crack does not propagate, confirming HE resistance of these areas. From the results of SSRT test in humid air, neither the base nor welding material showed reduction in strength or ductility compared to those obtained from the tests in dry nitrogen gas, as shown in Fig. 2. Therefore, it has been concluded that HE in 5083 MIG welds is only detectable by HG-SCC test. The reason for this should be in the fact that HG-SCC test can specifically test different local areas, while the softest area (weld center) always deforms preferentially and fractures in SSRT test.


