In magnesium (Mg) alloys, lots of kinds of severe plastic deformation (SPD) techniques have been conducted and finer grained microstructures have shown higher mechanical properties. The members of this group have achieved evolution of microstructure and strengthening in various metals and alloys fabricated by multi-directional forgoing (MDF) technique. Specifically, Miura’s research grope has performed continuingly refinement microstructure and improvement of mechanical properties in Mg alloys. On the other hand, because of lower ductility of Mg alloys at room temperature, MDF is always carried out at thermal condition. Warm atmosphere takes place the occurrence of dynamic recrystallization (DRX) phenomena in microstructure, which will be suppression of crack initiation during MDF as a result. Previous researches by Miura et. al. are sufficient reports on grain refinement and enhancement of tensile ductility and strength of wrought Mg alloys applied MDF method. For increasing a predominance on MDF technique from viewpoint of material development, it is necessary to grasp deformation and fracture morphology. Therefore, the purpose of this work is to investigate fundamentally tensile properties and its fracture behavior at room temperature and evolved microstructure of MDFed AZ31 magnesium alloy.
A commercial hot-extruded AZ31 Mg alloy was cut into rectangular shaped sample with initial dimensions of a =14 mm, b = 31 mm and c = 21 mm (i.e., aspect ratio, a : b : c = 1.00 : 2.22 : 1.49), where an axis of b dimension is equal to extrusion direction of the alloy. MDF was carried out at a quasi-static strain rate of 3 ![]() 10-3 s-1 using an universal testing machine. The sample was deformed by MDF with changing the loading axis at an angle of 90° from pass to pass. During MDF, those of forging temperature was gradually decreased pass by pass from 623 K to 493 K. The samples were MDFed to cumulative strain of ΣΔε = 2.4 at maximum, i.e., 3 passes of MDFing. Microstructure of the hot-extruded and MDFed samples were observed through optical microscope (OM) on three-axial planes. Mechanical properties of as-received and MDFed specimen were investigated by tensile and hardness tests. Tensile test using universal testing machine was carried out at room temperature with initial strain rate of 2.8
10-3 s-1 using an universal testing machine. The sample was deformed by MDF with changing the loading axis at an angle of 90° from pass to pass. During MDF, those of forging temperature was gradually decreased pass by pass from 623 K to 493 K. The samples were MDFed to cumulative strain of ΣΔε = 2.4 at maximum, i.e., 3 passes of MDFing. Microstructure of the hot-extruded and MDFed samples were observed through optical microscope (OM) on three-axial planes. Mechanical properties of as-received and MDFed specimen were investigated by tensile and hardness tests. Tensile test using universal testing machine was carried out at room temperature with initial strain rate of 2.8 ![]() 10-3 s-1. A strain gage was attempted on plane of a tensile specimen for measuring elastic modulus and 0.2 % proof stress. Scanning electron microscope (SEM) was used to observe fracture surface after tensile test of each specimen.
10-3 s-1. A strain gage was attempted on plane of a tensile specimen for measuring elastic modulus and 0.2 % proof stress. Scanning electron microscope (SEM) was used to observe fracture surface after tensile test of each specimen.
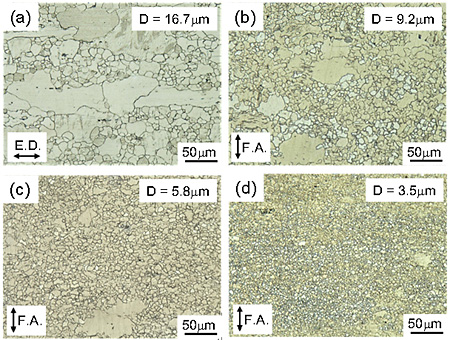
Figure 1 shows result of evolved microstructure at all samples. Arrows in figure indicate the extruded direction of (a) and forged direction of (b) to (d), respectively. As a result, the average grain size, D determined by line-intercept method decreases gradually with increasing cumulative strain from 16.7 µm to 3.5 µm due to DRX. Coarse grains are still observed in MDFed sample of 1st pass. However coarse grain disappears gradually with increasing cumulative strain. In that of 3rd pass, equiaxed crystals having an average grain size of 3.5 µm are obtained, the coarse grain hardly observed as shown in Fig. 1, (d). Also, in all microstructures, intermetallic particles such as inclusions, dispersoids and precipitations are not perceived.
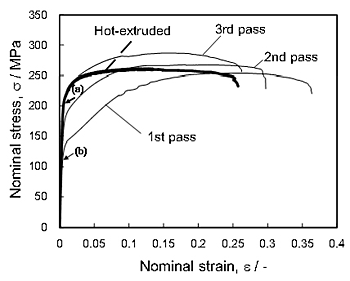
Figure 2 shows nominal stress-strain curves at each hot-extruded and various MDFed tensile specimens tested at room temperature. The curve of the hot-extruded forms elastic-perfectly plastic body response, which has 0.2 % proof stress, σ0.2 of 206 MPa, tensile strength, σB of 258 MPa and fracture strain, εf of 0.258. On the other hand, the curve of the MDFed specimen of 1st pass forms elastoplastic response owing to work-hardening deformation, which has σ0.2 of 117 MPa, σB of 254 MPa and εf of 0.344. Symbol, (a) and (b) show σ0.2 point of hot-extruded and 1st pass MDF specimen, respectively. A drastically change of the stress-strain response was confirmed after the early pass of MDF stage. These result suggested that a certain crystalline texture of hot-extruded sample is scrapped by one MDF process.
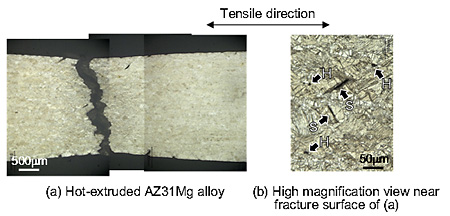
Figure 3 shows each microstructure: (a) macroscopic and (b) high magnification near fracture surface, viewed from a side plane of the hot-extruded tensile specimen observed after tensile test. Coarse shear cracks are observed at near fracture surface and at corner of the specimen. It is quite possible that coalescence of shear cracks forms final crack path as shown in Fig. 3, (a). Figure 3, (b) shows magnification view of the microstructure near fracture surface in Fig. 3, (a). Lots of slip bands and profuse twinning can be seen in many grains. Dense slip bands are made along to a certain orientations based on hot-extruded texture. The orientations of the bands in the grain interior are different depending on each grain. Additionally, shear cracks and small holes indicated symbol “S” and “H” respectively are evidently also observed. Shear cracks took place along to slip bands and grain boundaries at large strain regions. Furthermore, small holes arrowed “H” in the figure initiate triple points on the grain boundary and equiaxed fine grains. It is found that main fracture behavior at hot-extruded specimen is inter- and transgranular shear slip deformation and rupture.
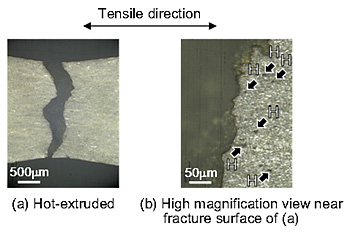
Figure 4 shows each microstructure: (a) macroscopic and (b) high magnification near fracture surface, viewed from a side plane of the MDFed 3rd pass specimen observed after tensile test. In Fig. 4, (a), development at necking deformation of the 3rd pass tensile specimen strongly progresses as compared with that of the hot-extruded. Moreover, many small holes arrowed “H” in the figure initiate at equiaxed fine grains with uniform distribution in the microstructure. Observed holes are circular shape, consequently, it occurs lower stress concentration in comparison to a shear shape crack. Furthermore, the multiaxial stress state in the internal necking between holes urges shear stress component to be lower. It is found that main fracture behavior at MDFed specimen is coalescence of small holes.


