Titanium and its alloys are characterized by lightness and corrosion resistance. They are widely used for aircraft manufacture and food container. The pure titanium has excellent corrosion resistance, although material itself is highly reactive. Thus, its products are mostly utilized in the chemical and petroleum industries. The titanium alloys find wide application in the aerospace and bionic man industries. The major alloying elements are aluminum and vanadium. The alloys have a high strength-to-weight ratio, high elevated-temperature properties and high corrosion resistance. Therefore, the alloys are increasingly used in extreme environments such as in aircraft engines. Since they often receive cyclic loads during their usage, the improvement of their fatigue properties is important. One of the promising methods is the shot peening (SP) process, which is a surface treatment where a large number of small steel balls are fired at the metal surface. The technique improves the fatigue strength by creating a work-hardened layer, leaving a compressive residual stress in the surface. More recently, the use of microshot peening (MSP) technology with minute media has become more widespread in consideration of the reduction of the notch effect in the material surface. In addition, ultrasonic shot peening (USP) that uses media of several millimeters in size with ultrasonic vibration has attracted attention as a means to reduce the surface roughness. In comparison with conventional SP technology, the compressive residual stress in the material surface with the USP technique is greater and the surface degradation is lesser, which results in improvements in the fatigue strength. SP technologies using fine particles and ultrasonic waves are increasingly studied, but titanium materials have not yet been fully studied. In particular, the peening effect on fatigue properties has rarely been studied. In this study, the effect of peening condition on the surface characteristics and fatigue life of titanium alloy was investigated using MSP, USP, and CSP.
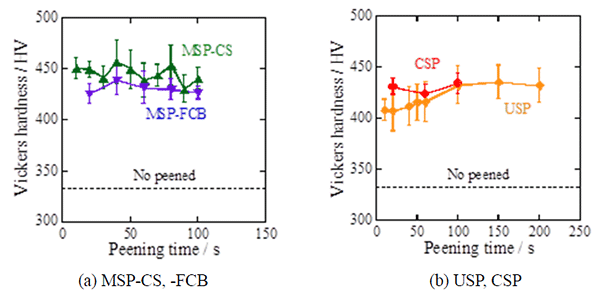
Figure 1 The relationship between the peening time and the surface hardness in the shot-peened workpieces are shown. After slightly rubbing the machined surface, the hardness was measured by pressing an indenter vertically into a flat area. In the case of MSP (a), the hardness was found to be approximately constant if the peening time was over 10 s. This suggested that the plastic deformation and subsequent work hardening of the surface layer were efficiently performed. On the other hand, in the case of USP (b), the hardness slowly increased with the peening time of 100 s. In the case of CSP (b), the hardness nearly the surface becomes higher by second MSP.
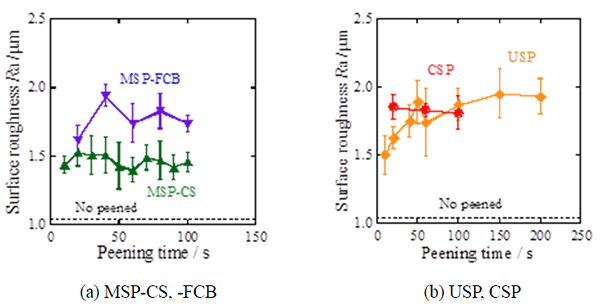
Figure 2 The change in the surface roughness of workpieces treated by each SP methods are shown. In the case of MSP-CS (a), the surface roughness varied between Ra1.4 and Ra1.5. On the other hand, in the other treatments, the surface roughness was higher. In the case of USP (b), roughness was constant at approximately Ra1.9, if the peening time was greater than 100 s.
Figure 3 Compared with the results of the MSP-FCB, USP, and CSP experiments, the roughness of the MSP-CSP treated surface was slightly less pronounced. In addition, the surface roughness was considerably smaller than that obtained with the conventional SP process.
Figure 4 Improvement of the fatigue limit was observed after the processing treatment. The magnitudes of the fatigue limit were arranged in order of MSP, CSP, USP, and non-processed workpieces. The fatigue limit was thought to be greater in the MSP-CS experiments because the hardness was higher at the top surface, having a small degree of surface roughness. The broken surfaces of the fatigue workpiece were observed with a microscope. In all fractured workpieces, the fatigue crack nucleation site was from the outer surface of the workpiece.


